Revolution of Love

Revolution of Love

Do small things with great love.

Pinterest Party & Link-up (Vol 23) and Operation Clean & Organize (vol 19): Weekly Menu Board (Revised)

It’s a two for one post today. I still get a number of hits for the post I wrote three years ago – Operation Clean & Organize: Vol 2 – Weekly Menu Board but I have since updated my menu board so I thought I’d update the post as well.

* * * * *

Welcome to the RoL Pinterest Party. Join me every 2nd and 4th Tuesday as we link up and share how we made, cooked, baked, crafted, planned, organized, followed or created one of the pins on our Pinterest boards OR share something original that others can pin onto their boards. (New and old posts welcome.)

AND

Taming the procrastinating, ADD, mess cat within me.

* * * * *

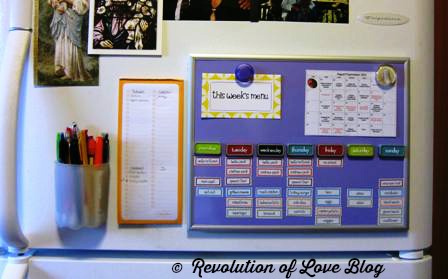
Back in August of 2011, I was looking for a weekly menu board to use in our kitchen. Thanks to Pinterest I finally found this one.

source

I liked it but it was too big and I wanted it to be weekly not a monthly menu so I decided to make my own smaller magnetic weekly menu. I spent a total of about $20 for a Board Dudes magnetic board the right size to fit on my fridge, a pack of Avery Printable Magnetic Sheets, and “Days of the Week” magnets that I found at Target in the Back to School seasonal section. (You can find similar products at Amazon – Board Dudes Magnetic Board, Board Dudes Days of the Week Magnets and Avery Magnet Sheets.)

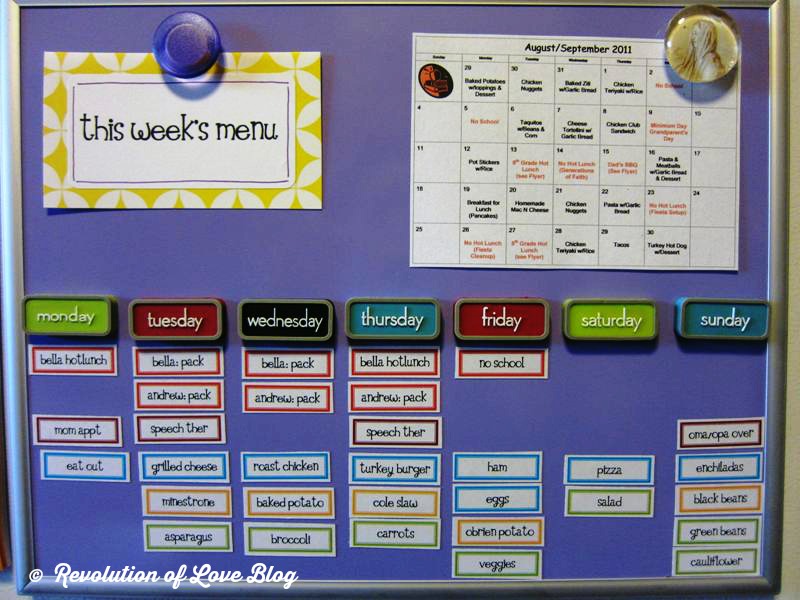
Next I sat down and made a master list of all the meals, side dishes and veggies I normally cook. In a Word document I made four columns of labels and typed up the list of foods. I color coded the labels: main dish – blue, sides – orange, veggies – green, appointments – purple, and school lunches – red. I made sure to have a number of blank labels to fill in later as I tried new recipes. Next, I printed and cut out the labels. Lastly, I arranged the meals on my board along with a shrunken down copy of Bella’s school lunch menu.

Here’s what it looked like then.

Revolution of Love Blog - menu_1W

Revolution of Love Blog - menu_2W

It looked great and worked well for awhile but fast forward three years (and two more kids) later. I still have the same magnetic board BUT the whole magnetic food items were just too time consuming. First, we changed our diet and I had to update or delete old meals. Plus, I was often trying new recipes, which meant I had to make a new label each time. The whole thing was fun while it lasted but not realistic.

I finally got rid of the food labels and just wrote straight on the board with a dry erase marker.

Now it works perfectly. I still have my shopping list next to the board and I still keep a shrunken version of the kids’ school hot lunch menu there and make note of evenings when we have something planned. If there is a last minute change in the menu I can change it with a quick swish of my finger. (And write in “Chipotles burrito bowls.”) πŸ˜‰

It may not be as pin-worthy as my previous version and perhaps when all the kids are in school and I have more free time I can go back to using the labels but for now, it’s not realistic. Plain and simple yet functional will have to do. πŸ˜‰

* * * * *

Now it’s your turn.

1. Choose your creation, share about it and snap a photo if you can.

2. In your post, link back the original blogger/idea, rather than your Pinterest pin. That way credit goes to the proper person. πŸ™‚ (But feel free to add your Pinterest profile link so we can follow you!)

3. Add a link back here so others can play along.

4. If you want to use it, here is the html code for the logo:

<a href=”http://www.revolutionoflove.com/blog/?p=2157″><img title=”Revolution of Love Blog – Pinterest Party &amp; Link-up” src=”http://www.revolutionoflove.com/blog/wp-content/uploads/2013/04/pinterest_2_medW32-300×240.jpg” alt=”” width=”300″ height=”240″ /></a>

5. Link up below. Make sure you’re sending us to your actual post, and not to your general blog address.

Lastly, you can follow me on Pinterest here: http://pinterest.com/rol_bobbi/. πŸ™‚

The link up will be active for 10 days. Have fun!


PS – You can follow RoL on Bloglovin, Feedly or another news feed. If you are a social media fan like me, we can stay in touch through Facebook, Twitter, Pinterest, GoodReads, Letterboxd or Instagram. (It’s set to private but I’ll approve you.) πŸ˜‰

PPS – This post may contain affiliate links.


Pinterest Party & Link-Up (Vol 22): Emergency Car Bins & Operation Clean and Organize (Vol 18)

This post is serving as double duty.Β  I am using the idea for the Pinterest Party but since it also comes under organizing, I’ll also include it in Operation Clean and Organize. πŸ™‚

**Taming the procrastinating, ADD, mess cat within me.**

Welcome to the RoL Pinterest Party. Join me every 2nd and 4th Tuesday as we link up and share how we made, cooked, baked, crafted, planned, organized, followed or created one of the pins on our Pinterest boards OR share something original that others can pin onto their boards.

* * * * *

We have three of the four kids in school now and John-Paul attends a Catholic pre-school about 20 minutes from our house. Last year once or twice I was rushing out the door (shocking, I know!) and I forgot to grab John-Paul’s backpack with his lunch box. I debated whether I should drive home and get it but that would mean 20 minutes to go back and get it, 20 minutes to drive back to school and another 20 to go back home. A whole hour wasted on a blasted forgotten lunch. Ugh. Instead I went to the local market and bought him some items for lunch. However, it also meant buying a package of brown paper bags, napkins, plastic spoons for his apple sauce etc. I told myself I should just keep a few spare items in the car in case I ever forgot again. (Yeah, I know I could avoid all this by getting out of the house earlier and making sure I have his bag and yada, yada, yada, but I also know myself. It’ll happen again.)

Shortly after I found these scrapbooking/ craft bins at Costco. There are some similar ones on Amazon.

There wasn’t a heck of a lot of room in our mini van so I loved the large flat size because they would fit perfectly under the back seat of our mini van. Well, the bins sat in our garage for months collecting dust. I kept telling myself, “Yeah, I’ve got to fix those bins up one day…” Well, last week we had a crazy day and I was lucky enough to get JP to school on time but… you guessed it, I thought he grabbed his backpack and lunch but he did not. There I was back at the local market buying another pack of brown paper bags, napkins, etc. I then came home, dusted off the dust-covered bins and started gathering our emergency lunch items.

It also got me to thinking that I had prepared my garage with supplies for a natural disaster but as much time as we spend in our car, what if a big earthquake hit while we were driving. (God forbid that it happens while I’m driving under an underpass. Being crushed to death in a tunnel during an earthquake is a secret fear. Don’t laugh!) We already had water bottles, a First Aid Kit, a flash light and some extra blankets in the car but no food. So I stocked the box up with plastic utensils, napkins and paper lunch bags, just in case and non-perishables like canned chicken, peanut butter, crackers, apple sauce, raisins etc.

Since we have recently changed our diets and switched to healthy foods without additives and preservatives, I used our old snacks for the emergency stash. I figured if there was a natural disaster or zombie apocalypse we wouldn’t be too concerned about whether or not our food had GMO’s in it and we’d be more concerned about not getting our brains devoured by the undead.

Lastly, I took a second bin and filled it with a make up bag filled with toiletries like toothpaste, deodorant, hand sanitizer, feminine products etc, extra diapers/pull ups and underwear (and change of pants for the potty trainers), baby wipes, some basic meds and spare batteries for the flashlights.

I slipped the pink box under the back seat and I put the white box in the trunk with the blankets and first aid kit. To make sure things stay fresh and are the right size, whenever we change our clocks forward or back I open up the boxes and replace what’s getting old. So far it’s worked out well. In fact, last week I ran out of the house and then realized I forgot to put on deodorant but no worries. I just used the one in the car stash. Hey, Ms-Always-on-Time-and-Organized, don’t judge. πŸ˜‰

The pin for this post is here.

Lastly, you can follow me on Pinterest here: http://pinterest.com/rol_bobbi/. πŸ™‚

* * * * *

Now it’s your turn.

1. Choose your creation, share about it and snap a photo if you can.

2. In your post, link back the original blogger/idea, rather than your Pinterest pin. That way credit goes to the proper person. πŸ™‚ (But feel free to add your Pinterest profile link so we can follow you!)

3. Add a link back here so others can play along.

4. If you want to use it, here is the html code for the logo:

<a href=”http://www.revolutionoflove.com/blog/?p=2157″><img title=”Revolution of Love Blog – Pinterest Party &amp; Link-up” src=”http://www.revolutionoflove.com/blog/wp-content/uploads/2013/04/pinterest_2_medW32-300×240.jpg” alt=”” width=”300″ height=”240″ /></a>

5. Link up below. Make sure you’re sending us to your actual post, and not to your general blog address.

The link up will be active for 10 days. Have fun!

PS – You can follow RoL on Bloglovin, Feedly or another news feed. If you are a social media fan like me, we can stay in touch through Facebook, Twitter, Pinterest, GoodReads, Letterboxd or Instagram. πŸ˜‰


A Look at My 2014 Planner

I have always loved planners and have always had one. Whether I was a young girl making lists in my Hello Kitty notebook or single and working or staying at home with babies. I have had various sizes – pocket, compact, standard, and binder sized. Each year it changes a little to accommodate my needs.

Last year I posted about my home management binder, my finance binder and my meal planning binder and they have pretty much stayed the same. However, I did get rid of my old planner and started new with a Martha Stewart Discbound Notebook. It worked so well last year that I am using it again this year.

When looking for planner sheets that work for me, they must be colorful and inviting or I’ll get bored and never use my planner. I have found my favorite planner sheets from Jen at I Heart Organizing.

Here is the monthly calendar view.

I like to color code events and appointments with washi tape. I use red for special occasions and outings. Green for school. Blue for doctor and other appointments and orange for birthdays. Sometimes I will also use flags or the Martha Stewart tear drop stickers. It depends on my mood that month. Although I like it colorful, I don’t like it too busy or it just gives me a headache. LOL. πŸ˜‰

If you aren’t into washi tape, there is also this cute Masking Sticker Set. Each sheet has precut strips and dots you can add to your planner.

This is the weekly view. There is a long column for each day where I keep track of all my To Do’s. For my bookmarker I used one from my Project Life kits and punched holes with my Discbound Punch.

I bought the planner pages that came with a menu section so I could keep track of the week’s meals.

I also love the Discbound because, like a binder, you can add anything you want after you’ve punched holes in it. However, I prefer it to a binder because you can fold it back like a spiral notebook, rather than having to keep it open. I was a little concerned at first about the papers coming loose and falling out but I use thicker sheets so it hasn’t been a problem at all. For my weekly pages I use 32 lb white and I recently started using cardstock (65 lb, white) for my monthly calendars. It has worked perfectly.

I bought two packs of Martha Stewart Discbound tabs and used my own label maker for the months. I like to follow the school calendar so I go from Aug to July. With my 4 extra tabs I have faith, home, blog and projects.


For my dashboard, I keep flags, posts, stickers and my mommy calling cards in the pockets. To keep the sticky pads in place I added glue dots to the back. The ordered the personalized coversheet.

Β On the other side of the coversheet, I added this collage of the ones I love the most.

The last page of my planner is a plastic pocket where I keep things like stamps and address labels.

This is a photo of how thick the binder is with the standard MS discs. I bought the larger silver MS discs and hated them. I tried the larger Levenger discs (2″ I think) and they worked well but it made the notebook too big. I switched to the 1 1/2″ discs and they work great. I have extra room but it isn’t too big for me.

Now, although my planner is not too big on my desk at home, it is not ideal to carry around in my purse. Last month I decided to get a small planner that I can keep in my purse to take notes while I am on the run and to keep track of my daily appointments.

I thought about getting a Filofax but it was out of my budget and I did not like the plain planner pages that came with it. Instead I bought this Lily binder in aqua from Franklin Covey.

I chose the Her Point of View planner pages.

So far it has worked well. It fits perfect in my purse. I keep track of my schedule. I have space for any To Do’s I think of away from home. And I have a blank page to jot down notes. Plus, it is so cute. πŸ˜‰

Lastly, my favorite item to go with my planners is still my traveling office. πŸ™‚

If you are looking for colorful planner pages, I also recommend The Rainbow Planner from A Bowl Full of Lemons. I have many of her smaller planner kits and they match my current planner wonderfully. If you don’t want to spend money on planner pages, you can try this one from iheartnaptime.net. Or you can check out this list of free planners put together by Jenny at Plain Grace.

UPDATE: Looking for other planner posts? Check out these:


PS – You can follow RoL on Bloglovin, Feedly or another news feed. If you are a social media fan like me, we can stay in touch through Facebook, Twitter, Pinterest, GoodReads or Instagram. πŸ˜‰


Pinterest Party & Link-up (Vol 9): Mini Traveling Office


Welcome to the RoL Pinterest Party. Join me every 2nd and 4th Tuesday as we link up and share how we made, cooked, baked, crafted, did, or created one of the pins on our Pinterest boards.

Not on Pinterest? No problem. Link-up your own creation to inspire us so we can pin it to our own boards. It can be a recipe, sewing project, Catholic craft, homeschool project, organizing/ homemaking tip, themed birthday party, whatever you’d like.

Don’t have a post ready? The link-up will be open for 10 days so there’s still time. Plus, feel free to link up a new post or an older post that hasn’t had much traffic lately.

Don’t have a blog? No problem. Post your photo and a description on the RoL Facebook page. πŸ™‚

* * * * *

My Pinterest Boards –pinterest.com/rol_bobbi/

The Pin That Inspired This Post – The Traveling Blogger

Back in April one of my favorite organizing bloggers, Jen at iheartorganizing posted The Traveling Blogger. She talked about how she keeps her traveling “office” organized.

Source: iheartorganizing.blogspot.com

I was particularly interested in how she used a makeup bag to hold her office essentials. I was smitten with the idea and every time I went to Target or Ulta I’d browse the make-up bags to see if there was something I could use in a similar fashion. I tried a few but they landed out being too small or too big or didn’t have enough pockets and I returned them back.

It’s August now and back to school supplies have been calling my name. I really wanted to get my traveling office together because I knew I’d be spending a lot of time in the car once school started and I was shuffling kids around and waiting in parking lots for school bells to ring. During those moments I always have a few spare moments to get some work done or a card written and mailed.

So when I went to Target this weekend, in between buying Q-tips and toothpaste, I passed the make-up bags and spotted this gem.

It had three zippered sections, sleeves for pens and was roomy enough to fit a lot but not too bulky for my tote bag. (I did not realize it at the time but when I went back to reread Jen’s original post, this was the exact make up bag she had purchased. No wonder she said it was perfect. It is!

So I gathered all the things I wanted to have in my mini traveling office: a mini journal, a small notebook, post-it notes, scissors, tape, mini stapler, staples, paper clips, binder clips, a cute little tin to hold the clips and staples (thanks for that mom ;-)) sharpie, pens, markers, thank you cards, blank note cards and stamps.

That may seem like a lot of stuff but it fit..and I even added a roll or two of washi tape since taking this pic. πŸ™‚

**

Sometimes I feel a little bad that I get more excited about office supplies than actual makeup but what can I say. I’m a nerd that way. All I know is that I love my little office set, almost as much as the Hello Kitty pencil case I had in the 4th grade. Some things never change. πŸ˜‰

UPDATE: It’s been over a month and I still love my little mini-office. Right now I am participating in the Planner Addicts Photo Challenge and for Day 9 I had to list my favorite essential while planning. My mini-office won hands down. πŸ˜‰

* * * * *

Now it’s your turn.

1. Choose your creation, share about it and snap a photo if you can.

2. In your post, link back the original blogger/idea, rather than your Pinterest pin. That way credit goes to the proper person. πŸ™‚ (But feel free to add your Pinterest profile link so we can follow you!)

3. Add a link back here so others can play along. Here is the html code:

<a href=”http://www.revolutionoflove.com/blog/?p=2157″><img title=”Revolution of Love Blog – Pinterest Party &amp; Link-up” src=”http://www.revolutionoflove.com/blog/wp-content/uploads/2013/04/pinterest_2_medW32-300×240.jpg” alt=”” width=”300″ height=”240″ /></a>

4. Link up below. Make sure you’re sending us to your actual post, and not to your general blog address.

You have 10 days to post your link, so if you can’t get things done by Tuesday, no worries, put it up when you can. We’ll be here. Have fun!

Lastly, you can follow me on Pinterest here: http://pinterest.com/rol_bobbi/. πŸ™‚

PS – You can follow RoL on Bloglovin, Feedly or another news feed. If you are a social media fan like me, we can stay in touch through Facebook, Twitter, Pinterest, GoodReads or Instagram. πŸ˜‰