


![]()
Instagram has been a favorite of mine ever since I joined in 2012. Unlike other forms of social media, there is no (or very little) negativity on my feed or in the comments. There are just lovely photos of nature, home life and cute kid shots that make me smile.
When Snapchat started I gave that a try and it was fun to have a less formal outlet to share funny moments and random thoughts that would disappear from my feed in 24 hours. However, very few of my friends were active on Snapchat. So when Instagram started something similar (okay, exactly like it) with Instastories, I was eager to participate in hope that more friends would also.
I am pleased to say that Stories is a hit and many of my friends are active on it. However, there are still those who are reluctant because they feel intimidated and aren’t sure how to use it. I’m hoping this primer on how to use Instagram’s Stories will help ease them into it so I can see their lovely faces on my feed soon. 🙂
The Basics of How to Make a Story
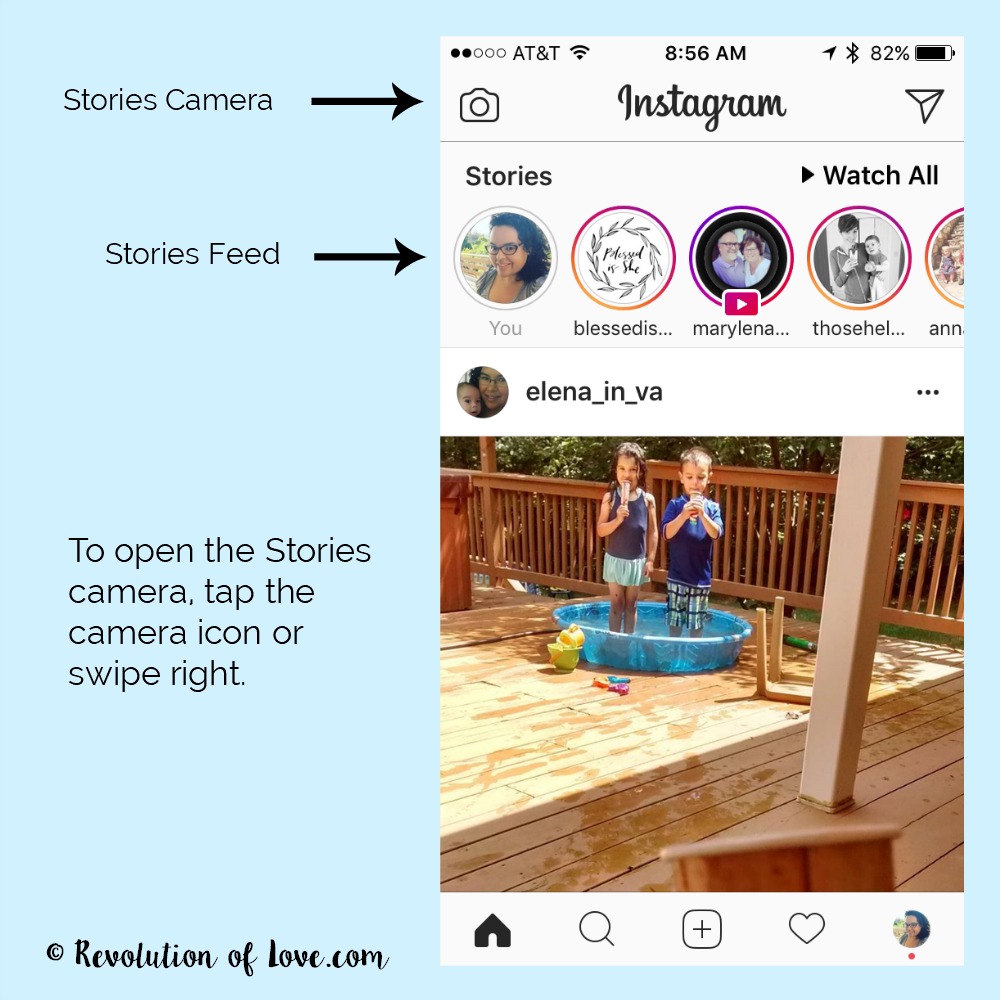
- Tap on the camera icon located at the top left hand of the home screen. OR Swipe right from the main screen.
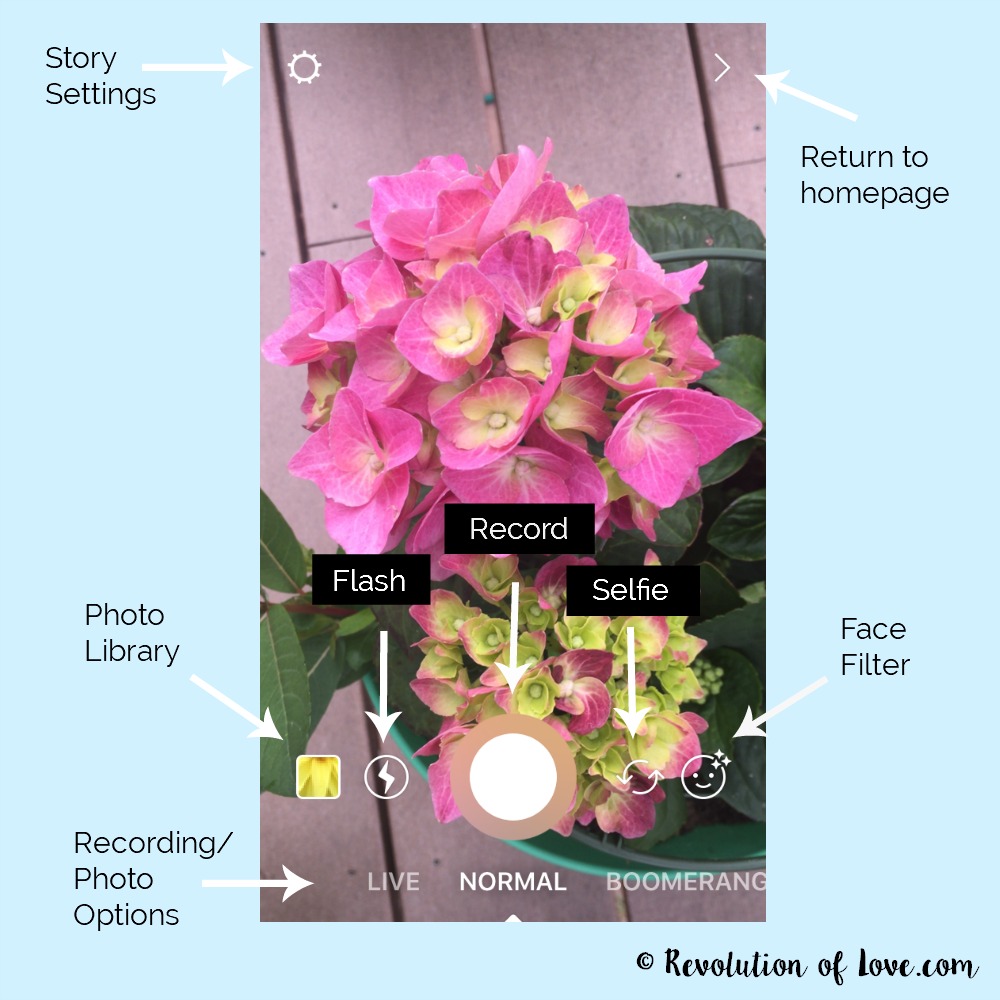
- In normal mode, tap the circle record/shoot button at the bottom of the screen to take a photo. Hold the circle button down to record a 15 seconds video. Keep an eye on your timing by watching the circle button. A red ring will surround it. Once the ring circles around the button, your time is up. Didn’t get it done in 15 seconds? Don’t worry. Just post a second, third and even fourth video continuing with your thought. No need to repeat what you already said. When a viewer watches your Stories, the videos will stream together.
- To switch the camera to take a selfie, tap the flip camera icon (double circular arrow.) This will switch the camera to forward facing.
- To adjust the lighting, click the flash icon.
- You can also record with Live video, Boomerang, Rewind and Hands free. (More on that below.)
- You can edit your photo or video with filters, text, stickers and drawings. (More on that below.)
- When you are done, tape the + sign in a circle. This will add the story to your feed. You also have the option to Save to your camera roll or to tap “Next” to send to specific friends with or without adding it to your feed.
- Once you’ve made your first story, it will appear in your friends Stories feed.
Other Recording Options
- Live video – Use this option to record a live video broadcast. Tap “Live.” Your phone may say “testing connection.” Then it will countdown 3, 2, 1 and you are live. When you are done broadcasting, tap the share button to add the live video to your your story feed for 24 hours. Your friends/followers will know you have a live feed available with the Play button under your photo icon in the stories feed.
- Boomerang – This mode shoots a short burst of photos and repeats the burst when played.
- Rewind – Use this mode to post a video that plays backwards.
- Handsfree – Use this to record a video without having to keep your finger on the record button. Again, the red ring with be your 15 seconds timer.
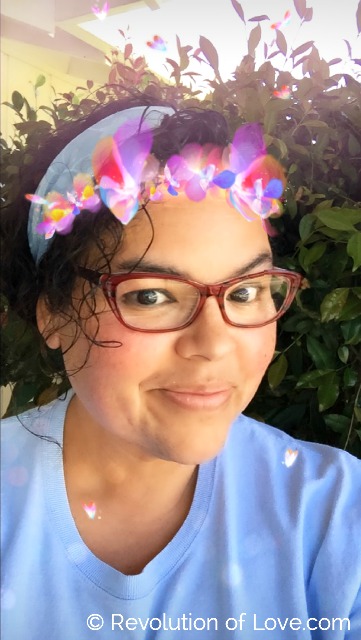
Using Face Filters
- In camera mode, tap the flip camera icon if the camera is not facing you.
- Tap the smiley face icon.
- Scroll the options at the bottom of the screen to choose a filter. (Note: Face filters will appear on the faces closest to the camera.)
- Once you find a filter you like, press/hold the record button. Post.
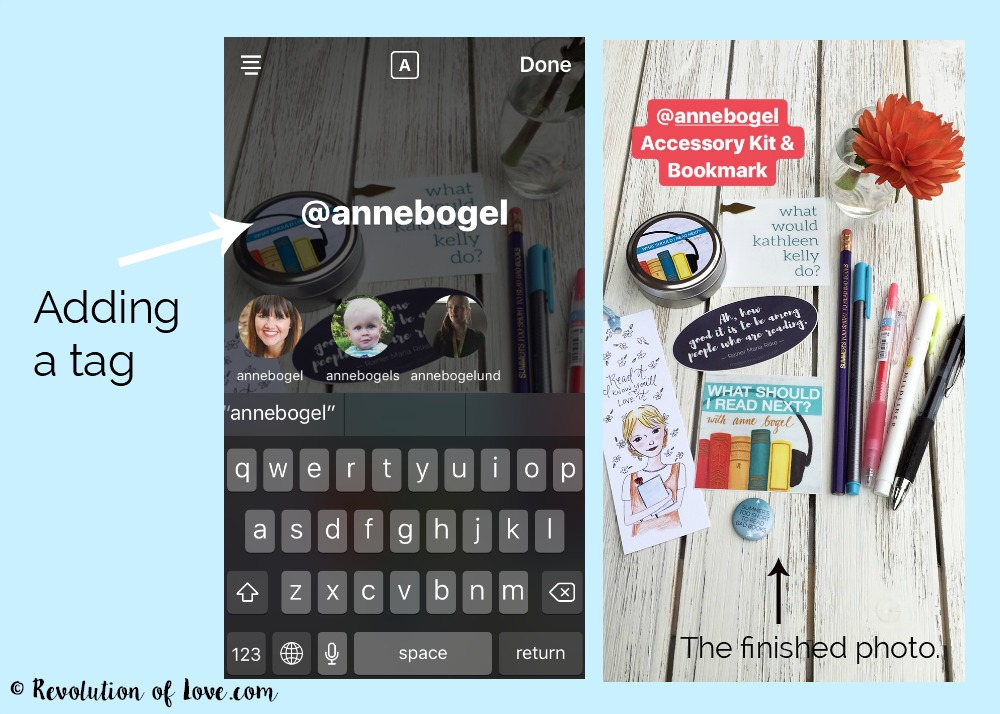
Tagging Someone in Your photo
To tag someone in your photo, simply type the @ symbol and their user name. If you follow that person or company, their icon will pop up. Tap on it to tag them. Now your viewers can click their tag to go to their profile.
Viewing Other People’s Stories Feed
- Your Stories feed is at the top of the home page. Swipe left to scroll through everyone in your Stories feed.
- Tap the person you want to watch or tap “Watch All.”
- When watching a story you can skip to the their next story by tapping the right of the screen. You can re-watch their story by tapping the left of the screen.
- To keep a story from moving to the next one (ie. so you can read a long text) hold your finger on the screen.
- To comment on a person’s story, type in the “write a message” box. To send a photo or video response to their story, click the camera icon.
- To skip to the next person on your feed, swipe left.
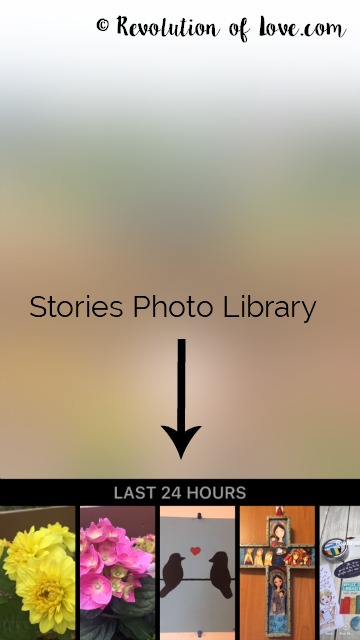
How to Make a Story Using Your Photo Library
I frequently wait to make a Story until later. This way I can enjoy the moment without having to constantly stop and edit and post a photo. Instead, I’ll snap photos or record video (keeping an eye on the camera timer to only record 15 seconds) and then later I’ll piece them all together for my Stories. Here’s how.
- Open your Stories camera. Tap the lower left hand photo library icon. Here you will find your saved photos and video from the last 24 hours. Choose the one you want to post. (Note: the IG camera will crop a little off the left and right hand side of the photo.)
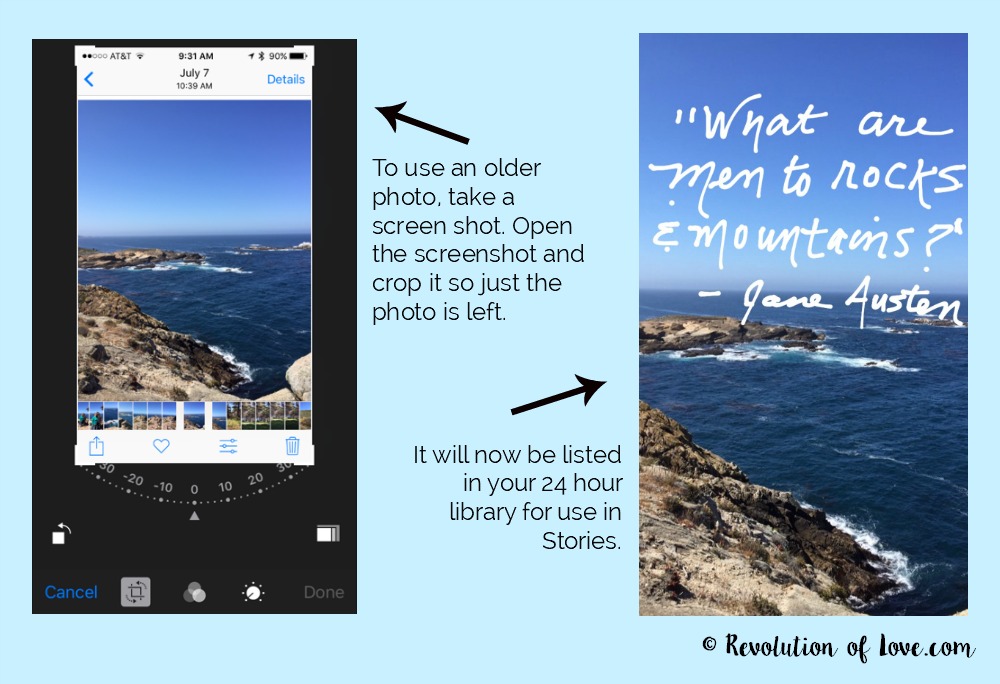 TIP: If you want to use a photo that was taken more than 24 hours ago, just take a screenshot of it. Open the screenshot (not the original) and crop out the parts you don’t want. Save. It will now be listed in your 24 hour library. Edit photo as usual and post.
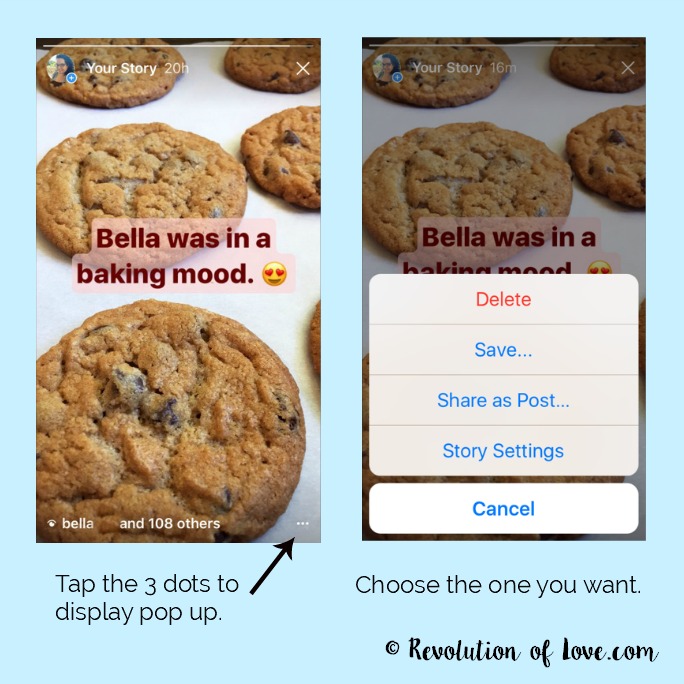
How to Save, Delete and Change the Settings
- Tap your photo icon in the Stories feed at the top of the home page. When your story comes up, tap the 3 dots icon on the bottom right corner. Here you have a choice to Delete, Save, Share a post (to your regular IG photo feed) or change your Story Settings (ie. who can see your stories and whether you want your stories automatically saved to your camera roll.)
- When you save a story you have the option to save a single story or all the available stories as one video. I like to save my day’s stories in the evening before I go to bed.
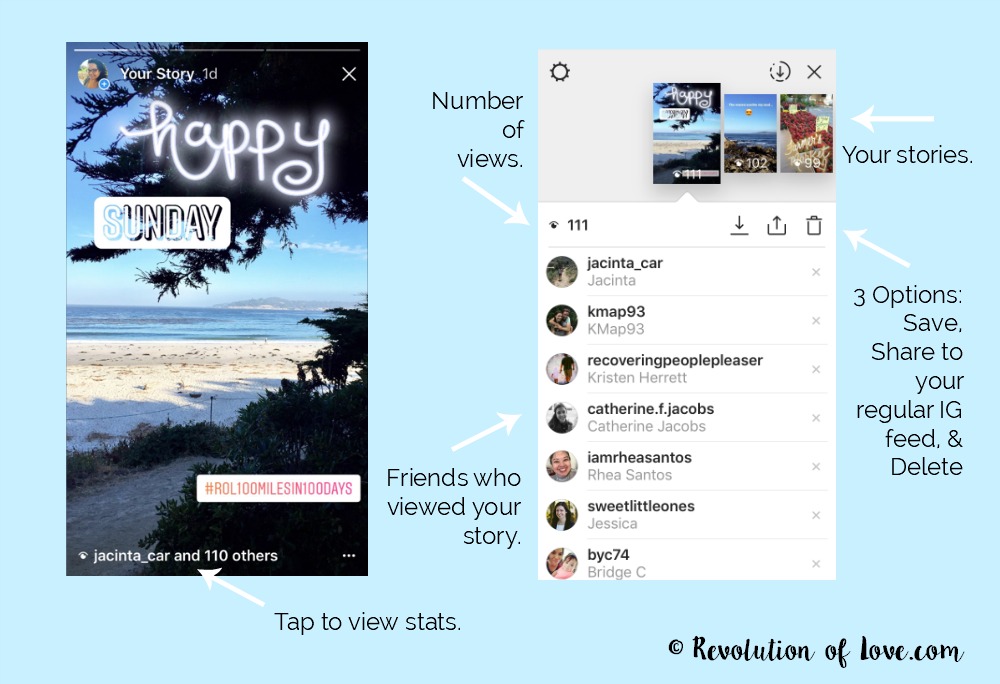
How to Check Your Stats
- You can also check to see how many and who has watched your stories. When viewing your story, click on the bottom of the feed where it ways “so and so and 50 others…” A screen will pop up and list all the people who viewed your story.
- If you have a public feed and someone sketchy is watching your story, you can hide your Story from them by tapping the X. Or you can block them completely by clicking on their name and their profile will pop up. Tap the 3 dot icon at the top right corner. You’ll have various options, including blocking them completely.
Now that you know the basics, here are more details on how to edit your photos and videos.
How to Edit a Photo
- Using Filters
- Swipe (left or right) across your photo or video to change the filters such as color tone and black & white.

- Using Stickers
- Tap the sticker icon and scroll down to view your sticker options. IG frequently adds new stickers, especially for the holidays.
- To view your recently used stickers, swipe right
- Some stickers such as the day of the week and the time have different versions. It will say “tap for more” above those stickers.
- The hashtag sticker can be customized by tapping it and adding your own hashtag. Options will pop up as you type. Viewers can tap the hashtag sticker and view other IG photos with the same hashtag. (Note: this also works with texted hashtags.)
- Some stickers, such as the location and temperature, need to have the location services turned on. Location stickers will act like a hashtag. A viewer can tap on them and see a feed of IG photos taken at the same location.
- If you want a sticker to stay on a certain spot of your photo, video or boomerang, you can pin it. Place the sticker where you want it then tap and hold. A pop up will ask of you want to pin it. Tap “pin.” Viola.
Adding Text
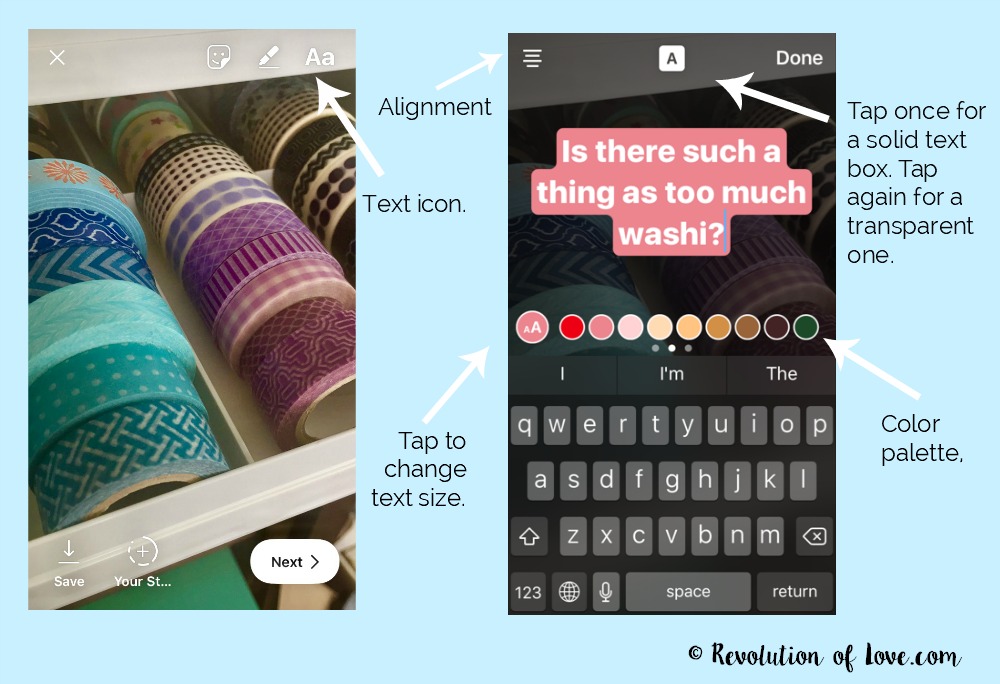
- To add text to your photo or video, tap the text button (Aa) at the top right hand corner of the screen.
- The text will automatically be in white. Tap a color to change it. Swipe left on the color palette to view more color options.
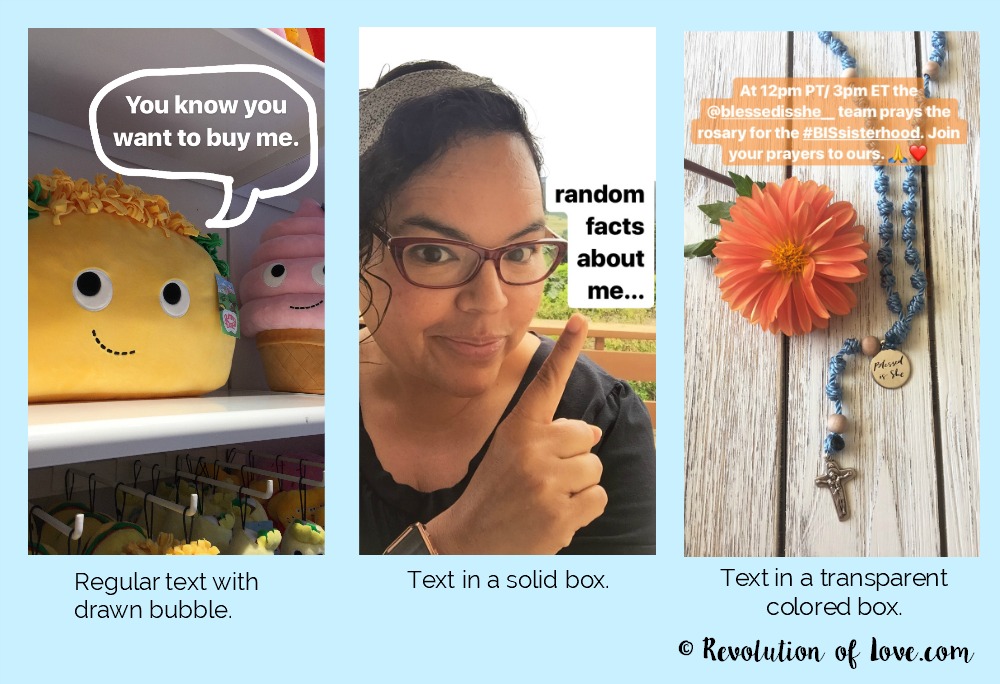
- To add your text in a box, tap the A in a box icon at the top middle of the screen. Tap it once for a solid box. Tap it again for a transparent box.
- To change the color of the text box, click a color on the color palette.
- To change the size of your text, tap the resize button to the left of the color pallet. Slide the lever up for larger text and down for smaller.
- To change the alignment, tap the alignment icon at the lop left hand of the screen. Choose left, right or center.
* * *
Using the Drawing Tools
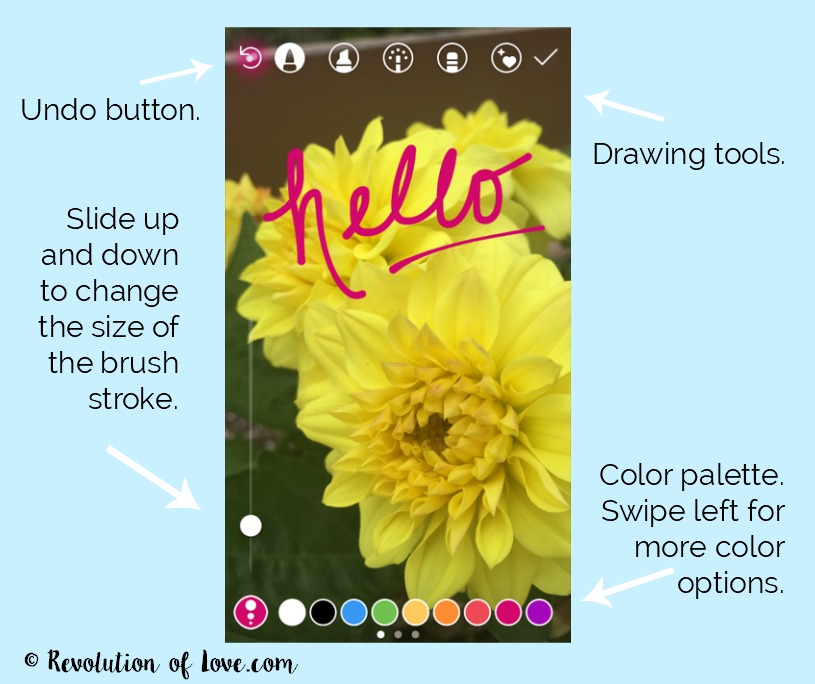
- To add drawings or writing to your photo or video, tap the pen icon.
- Choose a color on the color palette.
- Change the size of the brush stroke by clicking the size icon to the left of the color palette. Toggle up for a broad line and down for a narrow line.
- Choose your pen options at the top of your screen. Your options are paintbrush, marker, glowing highlighter, eraser and rainbow.
- Tap the undo button (back arrow) at the top left of the screen to undo a drawing or stroke.
- Once you are done, tap the check icon.
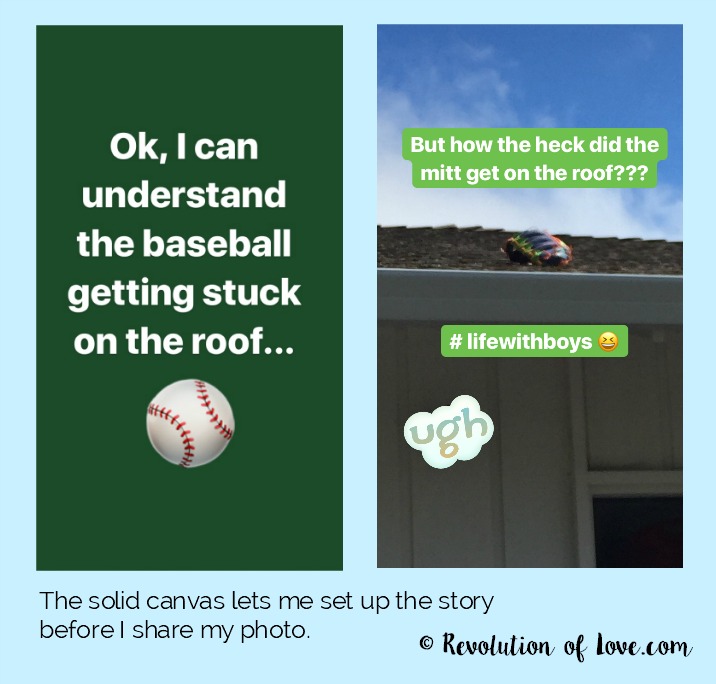
Using a canvas background
Sometimes you may want to add a text to a solid background and not a photo. Here’s how to make a blank canvas.
- Take a photo of anything.
- Tap the drawing icon.
- Chose a color and tap it.
- Place your finger on the photo and hold it there until it is filled with your chosen color.
- Use text, stickers or drawing on your canvas.

6. You can use the erase button to reveal part of the photo behind the canvas color.
Well, I think that covers all the basics. Was there something I forgot? Let me know in the comments and I’ll add it to the list. 🙂
You can find me on Instagram @bobbi_rol. I hope to see you there too! Happy Instagramming. 🙂

PS – You can follow RoL on Bloglovin, Feedly or another news feed. If you are a social media fan like me, we can stay in touch through Facebook, Twitter, Instagram, Pinterest, GoodReads, Letterboxd, or Spotify, 😉
PPS – Disclaimer: “Revolution of Love.com is a participant in the Amazon Services LLC Associates Program, an affiliate advertising program designed to provide a means for sites to earn advertising fees by advertising and linking to Amazon.com.”
In other words, if you click on my affiliated links and make a purchase, I get a small compensation that goes towards keeping the blog online. Big hugs to those who click and help support the blog! xoxo 🙂
Bobbi,
thank you for this! (blushing)
I was very unsure using the Insta Stories, I was kind of scared. (blushing)
Hugs 💐
I hope it helped, Kasia! Are you using it now? 🙂
Yes, it helped a lot!
Unfortunately I’m still to shy to use it, but I’m working on it 😉
This is a gold mine, Bobbi! I knew most of this but definitely not all. Love the graphics, too!
Thanks, Micaela. 🙂
Oh my gosh! I knew I had a lot to learn but didn’t realize it was *this* much!! Thank you for sharing your wisdom!
Thanks for the push to finally sit down and write this, Theresa. Hope it helps! 🙂
This is wonderful, Bobbi! Thank you!
You’re most welcome, Julie. 🙂
Thanks that helps a lot! I didn’t know most of it. 🙂
You’re welcome, Elena! I’m all for seeing you more, sis. 😉
I am still so nervous about this, but your explanations helped a lot. Thanks, Bobbi. ❤️
Abbey, I just finished watching your stories on the BIS Blessed Conversations. You did such a great job! You explained things beautifully, put the viewer at ease when all the info seemed daunting and added loveliness to your images. By the end of it, you looked like a pro. <3